DreamBox Plus Manual
- Intoduction
- Get Started
- Interface Description
- Boot modes description
- Functional Operations
- Options
- Reading Information about the Phone
- Unlock all locks
- Reading full phone flash
- Writing selected flash blocks (use Flash Tree)
- Restoring IMEI
- Read / write phone settings
- Lock to net
- Set Auto-Lock
- Contrast Atjusting
- Scenario
- S-Key Viewer
- Reading Diagnostic code
- Reading custom flash block memory
- Writing custom flash block memory
Introduction
What is DreamBox
DreamBox is a device for servicing and repairing Siemens cell phones. It can unlock and flash S-Gold platform Siemens phones without disassembling the handset, and E-Gold platform Siemens phones without cutting tracks as well as many other phone models. It allows performing flash operations at a very high speed (DreamBox is the fastest USB device for Siemens phones available on the market today), automatic boot selection, partial flashing of ALL blocks, phone display contrast adjusting, multiple operation execution in loop (especially for unlock/flash of many phones). DreamBox also reports phone diagnostic codes, supports original Siemens flash file format (Winswup), works with customer settings (can use original Siemens map files) and supports many other useful features
Main Features
What DreamBox is engineered for?
- DreamBox is the fastest USB device for Siemens phones available on the market today;
- Support of most E-Gold platform Siemens phones without cutting tracks;
- Direct support of most S-Gold Siemens phones;
- Unlock all locks and phone codes;
- SP-Lock to any network;
- Read/write EEPROM, firmware, flash;
- Fast read/write language packs/T9 packs;
- Repair all dead phones;
- Repair IMEI;
- DBSS supports all known flash files formats;
- Can read/write customer flash blocks;
- Several boxes can be connected to the same PC;
- Remote UPDATE function (box firmware and software version can be updated remotely);
- Can use other flash formats: *.bin, Original Siemens Service and Update file format (*.exe);
- Can manage/view phone's boot keys;
- Can use original Siemens map files;
- Contrast adjusting, phone ON/OFF, Simulate SimCard;
- Format FFS (Mobile Flash File System);
- High volume automation of all operations;
- Scenario (multiple operation execution in loop) - especially for unlock/flash of many phones.
| A series | C series | E series | M series | S series | Other series |
| Siemens A31 Siemens A50 Siemens A51 Siemens A52 Siemens A52M Siemens A52V Siemens A55 Siemens A56i Siemens A57 Siemens A60 Siemens A62 Siemens A62C Siemens A65 Siemens A65C Siemens A70 Siemens A71 Siemens A75 Siemens AF51 Siemens AL21 Siemens AX72 Siemens AX75 |
Siemens C45 Siemens C55 Siemens C56 Siemens C60 Siemens C65 Siemens C66 Siemens C6C Siemens C6V Siemens C70 Siemens C72 Siemens C72V Siemens C75 Siemens C81 Siemens CF110 Siemens CF62 Siemens CF75 Siemens CX65 Siemens CX6C Siemens CX6V Siemens CX70 Siemens CX75 Siemens CX7C Siemens CX7i Siemens CX7V |
Siemens EL71 | Siemens M46 Siemens M55 Siemens M56 Siemens M65 Siemens M6C Siemens M75 Siemens MC60 Siemens ME45 Siemens ME75 Siemens MT50 |
Siemens S45 Siemens S45i Siemens S46 Siemens S55 Siemens S65 Siemens S66 Siemens S68 Siemens S6C Siemens S6V Siemens S75 Siemens SK65 Siemens SK6R Siemens SL45 Siemens SL45i Siemens SL55 Siemens SL65 Siemens SL6C Siemens SL75 Siemens SP65 Siemens SX1 |
Siemens 3618 Siemens 6618 |
| Siemens models that do NOT require disassembling | C45 C65 C66 C6C C6V C72 C75 CF75 CX65 CX70 CX75 CX7i M65 M75 ME75 M6C ME45 MT50 S45 S45i S65 SK65 SK6R SL45 SL45i SL65 3618 6618 C72V CX6C CX6V CX7C CX7V SL6C C70 S6V S6C S66 S46 S75 SL75 SP65 |
| Siemens models that require testpoint procedure | A50 A51 A52 A52V A52M A55 A56i A57 A60 A65 A70 A71 A75 AX75 A62 A62C A65C AX72 A31 AF51 AL21 C55 C56 C60 CF62 M46 M55 M56 MC60 S55 SL55 CF110 SX1 S68 C81 EL71 |
| ODM models (supported by calculation of unlock codes) - direct connection, DreamBox is not required | 8008, CL50, CL55, ST55, ST55(old), ST60 |
Version History
What’s new in the latest version
DBSS v2.0
- Added “Format Bootcore” mode for most S-Gold phones.
- New flash type for EL71 supported.
- Full Flash option is added to the scenario.
- New User Interface:
- Options dialog added;
- Phone info always visible;
- Rarely used controls moved to menu;
- Full Flash tree redesigned;
- Copy from log activated;
- "About" box is upgraded;
- Manufacturer list and model dropdown list are joined in one combo tree.
- CX75, SL75 communication process improved.
- "Disable strict model validation" option implemented.
- "Repair IMEI after FullFlash" allowed.
- Delete “Custom data” for E-Gold phones.
- Movable User Data storage added.
- Software algorithm is totally reorganized
- Siemens SP65 model is supported.
- Auto power on option in manual java.
- Phone Power On / Off function.
- Improvement on Siemens contrast tuning.
- Simulate SimCard feature.
- Renewed interface.
- Skip "RAM Testing" (Hold "Shift" key during the process).
- M56 (special thanks for Bi0H4z4rD) and C56 phone models added.
- Testpoint procedure is now supported for SL75.
- First ever support of Siemens EL71 is added.
- Operator code list added.
- Info splash screen in Testpoint mode.
- "About" box upgrade.
- Sorting added in Skey Viewer.
- Testpoint boot mode improved for S-Gold phones. No button pressing needed.
- Contrast tuning fixed for MC60 and M55 phone models.
- Scenario Auto Restart improved.
- Unlock by Codes option (no DreamBox connection required) for the following ODM models : 8008, CL50, CL55, ST55, ST55 old, ST60.
- Format FFS (Mobile Flash File System) for S-Gold models.
- Boot mode auto select.
- Software based on new improved algorithm.
- Siemens A56i is added to the list of supported models (special thanks for Bi0H4z4rD).
- Scenario (multiple operation execution in loop).
- Contrast tuning improved.
- Maximum flashing speed auto select.
- Siemens AF51 cut track picture added.
- First ever support of Siemens C81 is added.
- Skey viewer is added
- Some minor User Interface improvements.
- Added contrast adjusting for majority of supported models
- Added Auto/Firmware Bug (Manual) mode for Siemens S68 model.
- Siemens A71 is added to the list of supported models (unlock with testpoint)..
- New flash type for Siemens A31 included into the range of DreamBox compatible.
- Siemens S68, AL21 models are added.
- Added new .xbz format support.
- Siemens .map files support.
- New .dmap files format (old dreambox .map format also supported).
- Improved data transfer with retry and bad packet detection options.
- Fixed Auto mode (fail on some S-Gold models).
- Fixed boot algorithm.
- Siemens S75, A31, AF51 models added.
- Siemens SL phone model added (only Auto/Firmware Bug mode).
- Siemens A60, C60 -- supported in testpoint mode.
- User manual now included in distribution.
- Testpoint pictures updated.
- Fixed bugs:
- software crash on some AMD flash chips (CX70, CX65, M65 models);
- Win98 compatibility problem.
- Siemens S46 now is supported.
- Testpoint for E-Gold platform is improved.
- Fixed bugs:
- bug with A70 with 4Mb flash
- bug with Vodafone-customized phone models
- bug with testpoint for SGOLD-platform
- minor bug with Diagnostic Code
- bug with phones with AMD S29WS256N flash type.
- bug with Siemens S55
- Some minor bugs
Package Contents
DreamBox Package contains:
- The DreamBox Device
- USB connection cable
- Cables for connection with phones
- Test point and battery cable
System Requirements
Proper DreamBox operation requires the following minimum PC configuration.
- 400 MHz CPU
- 16 Mb RAM
- HDD space 20 Mb
- VGA video card
- Port USB 2.0
- Windows 98/ME/2000/XP
Get Started
Activate DreamBox
For work DreamBox requires activation
- Visit our site www.dreambox.hk and choose DreamBox Service Software in DOWNLOAD section.
- Get latest version of DBSS
- Install DBSS
- Connect DreamBox and install drivers (they are in DBSS folder)
- Run DBSS
- Choose DreamBox->Update Firmware in main menu (You should have stable internet connection)
Install and Uninstall DreamBox Service Software (DBSS)
To install DreamBox Service Software- Please, ensure that your computer meets the minimum System Requirements.
- Download DBSS installer from www.dreambox.hk.
- Double click Setup.exe.
- Follow the instructions of Setup Wizard.
To uninstall DreamBox Service Software
Method No.1:
- Click Start on the Windows taskbar.
- Search for DreamBox among the Programs.
- Choose Uninstall.
Method No.2:
- Click Start and select Control Panel in the Windows taskbar.
- Double-click Add or Remove Programs.
- From the list of currently installed programs, select DreamBox and click Remove.
Note: After finishing Uninstall process, DreamBox folder may still remain on the hard disk, so the user has to remove it manually.
Start operating
To start working with the DreamBox you should accomplish the following steps:
- Connect DB to PC using USB cable
- Operating system will inform that a new device is detected.
- If operating system has not identified the new device automatically, please select manual search for the necessary driver. Specify the path to the DreamBox driver and wait until the system installs the driver.
- Open Start > Settings > Control Panel > System, click Device Manager button on Hardware tab. A new window will appear – open the Universal Serial Bus controller’s node. Make sure that this node contains the DreamBox sub-node and there are no conflicts. If there is a conflict, contact hardware/software consultant.
- Run DBSS application.
- The program will notify you of your serial number and application version. Light indicator on DreamBox device will light green.
- To update the DBSS version or the driver, please, visit our web site at http://www.dreambox.hk.
Interface Description
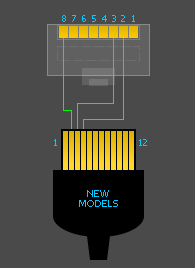
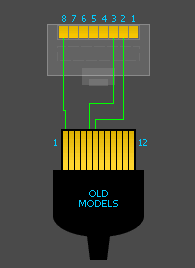
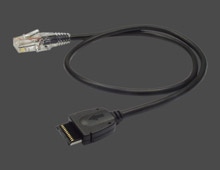
Cables
 |
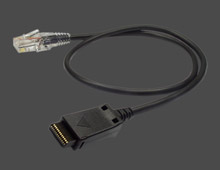 |
| For new models (5x-6x-7x) |
For old models (3x-4x-50) |
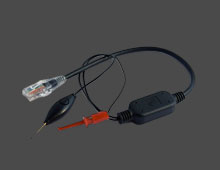
Testpoint & battery cable
1, 2 – testpoint connectors
3 – battery connector
DreamBox Interface
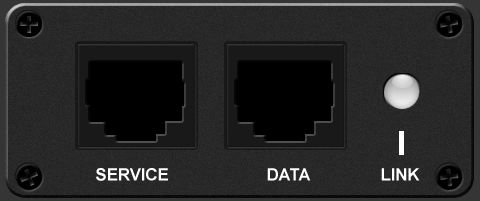
There are 2 connectors on the front side of the DreamBox for connection with a phone:
- "Service" connector – for battery and test pointcables.
- "Data" connector – for phone data cables.
There is a two-color light indicator on the front side of the DreamBox. It shows current device status. Each color stands for certain status of the device:
Green – READY. Device is in standby mode – ready to start operations.
Green/Red blinking – PROCESS. Operation is begin progressed.
Green/red blinking – PROCESS. Operation is being processed by device. Wait until the indicator’s color turns to green.
Red – ERROR.
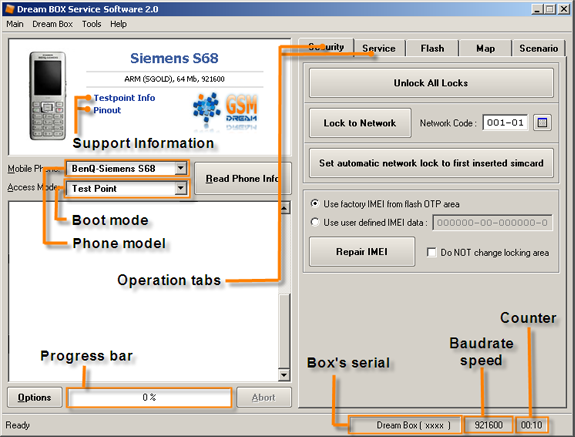
DreamBox Service Software (DBSS) Interface
Boot modes description
Auto
In this boot mode, software searches available boot methods, in such order:
- Search keys in database.
- Normal booting.
- Boot with bootcore bug.
- Boot with firmware bug.
How to use:
- Connect the phone to the box.
- Choose model, speed, and boot mode (Auto).
- Click Read Info.
- Wait until DBBS will show phone info.
After the first boot all operations with the phone will be very fast, because DBSS will use stored boot key for this phone. If this boot method does not work correctly, you can use Firmware Bug (Manual) or Testpoint boot methods.
Firmware Bug (manual) boot mode
The method is based on firmware bug (provides for manual operations).
This boot mode should be used in S-Gold platform phone models if Auto boot mode can’t boot the handset. Clamshell and slider phone models must be opened!SimCard must be removed from the phone!
We recommend to use phone battery (not DreamBox battery) connector for this boot mode.
- Power on the phone.
- Connect the phone to the box.
- Click Read Info.
- Go to the Surf&Fun > Application or Surf&Fun > Games menu.
- Go to the SReader folder.
- Start Sreader applet.
- Click Ok.
- Click Yes.
After that you can use Auto mode
Boot Core Bug
The method is based on previously saved boot core information of EGOLD phone models.
Test Point
This boot mode uses testpoint cable to boot the phones.
IMEI boot mode
Boot phone by IMEI (only for the handsets that have been served before.
This boot mode use stored secure keys for phones. Use this boot mode only if "Auto"(For S-Gold) or "Stored boot keys"(for E-Gold) methods don't work.
Stored Boot Key
This boot mode uses stored or manually entered keys for E-Gold model.
Normal
This boot mode can be used if:
- the phone has clear boot core;
- phone boot core is not initialized;
- phone boot core is patched and can be booted with wrong keys.
Normal (Cut track)
Boot E-Gold phones after cut track. In some cases this method is required for the handsets with damaged bootcore.
Functional Operations
Options
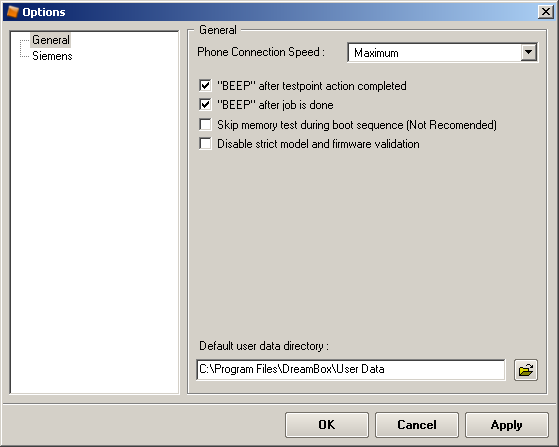
Connection speed
Allows to set read/write speed.
Skip memory test during boot sequence
Allows to skip "Testing RAM" while booting a phone. Recommended for advanced users only.
Disable strict model and firmware validation
Allows to flash a phone model, which is not supported by DBSS. This function can be applied to some branded or localized phones. Performing of this option does not ensure a correct phone functioning after the flash process is completed. Recommended for advanced users only.
Repair IMEI after flashing EEFULL or EELITE area (use OTP IMEI)
DBSS will automatically perform Repair IMEI after FullFlash, flashing Settings or flashing EEFULL/EELITE..
Reading Information about the Phone
This function shows essential phone information (IMEI, flash model, SW version etc.)
- Connect DreamBox to PC and run DBSS. The light indicator glows green, which means that DreamBox device is ready to work.
- Connect the phone to the front side of DreamBox. The phone must be switched off, and the battery should be charged at least for 40% of its overall power.
- Choose the required phone model from the scrolling list and select a correct access mode. (See “Access modes” description).
- Click “Read Info” to get restricted information.
- The light indicator is blinking, which means that you should wait until the process is completed.
- Information about the phone appears in the log field.
Unlock all locks
- Connect DreamBox to PC and run DBSS. The light indicator glows green, which means that DreamBox device is ready to work.
- Connect the phone to the front side of DreamBox. The phone must be switched off, and the battery should be charged at least for 40% of its overall power.
- Choose the required phone model from the scrolling list and select a correct access mode. (See “Access modes” description).
- Select “Security” tab.
- Click “Unlock All Locks”.
- Disconnect the handset.
Reading full phone flash
Use this option to read and save phone full flash.
- Connect DreamBox to PC and run DBSS. The light indicator glows green, which means that DreamBox device is ready to work.
- Connect the phone to the front side of DreamBox. The phone must be switched off, and the battery should be charged at least for 40% of its overall power.
- Choose the required phone model from the scrolling list and select a correct access mode. (See “Access modes” description).
- Select Flash and press “Normal”.
- Click “Read Full Phone Flash” button
- Save the file to the required directory.
Writing selected flash blocks (using Flash Tree)
This feature allows to write some standard flash blocks (language packs, bootcore etc.) from flash file into the phone.
- Connect DreamBox to PC and run DBSS. The light indicator glows green, which means that DreamBox device is ready to work.
- Connect the phone to the front side of DreamBox. The phone must be switched off, and the battery should be charged at least for 40% of its overall power.
- Choose the required phone model from the scrolling list and select a correct access mode. (See “Access modes” description).
- Select “Flash’ tab and press "Normal".
- Open Phone Flash file.
- Check needed flash blocks in Phone Flash Tree.
- Click “Write Selected Flash Blocks”.
- Disconnect the handset.
Restoring IMEI
Use of this option enables to restore damaged phone IMEI
- Connect DreamBox to PC and run DBSS. The light indicator glows green, which means that DreamBox device is ready to work.
- Connect the phone to the front side of DreamBox. The phone must be switched off, and the battery should be charged at least for 40% of its overall power.
- Choose the required phone model from the scrolling list and select a correct access mode. (See “Access modes” description).
- Select “Security” tab.
- To update or restore IMEI (International Mobile Equipment Identifier), mark the “Use factory IMEI from flash OTP Area” checkbox.
- To restore IMEI manually, type former 14 digits of the digital number
- Click “Repair IMEI” button.
If checkbox "Do not update/repair security area" is checked, all network locks will remain saved. Otherwise all locks will be unlocked.
Read / write phone settings (MAP)
Use this option for reading settings from a phone to a file or writing settings from a file into a phone.
- Connect DreamBox to PC and run DBSS. The light indicator glows green, which means that DreamBox device is ready to work.
- Connect the phone to the front side of DreamBox. The phone must be switched off, and the battery should be charged at least for 40% of its overall power.
- Choose the required phone model from the scrolling list and select a correct access mode. (See “Access modes” description).
- Select Map tab.
- If you want to read phone settings, click “Read All Phone Settings” button.
- If you want to write phone settings :
- Open settings file
- Check settings in settings tree, that you want to write
- Click “Write Selected Settings” button
- Disconnect the phone when operation is completed.
Lock to net
Use this chapter to lock the phone to service provider's network.
- Connect DreamBox to PC and run DBSS. The light indicator glows green, which means that DreamBox device is ready to work.
- Connect the phone to the front side of DreamBox. The phone must be switched off, and the battery should be charged at least for 40% of its overall power.
- Choose the required phone model from the scrolling list and select a correct access mode. (See “Access modes” description).
- Select Security tab.
- To lock the phone to certain network, specify network code in corresponding field Network Code and click Lock to Network button.
- Switch the phone on manually and wait until the operation is over. Locking settings from one phone can be saved and used on another one.
Set Auto-Lock
Use this option to lock a phone to a sim-supported network.
- Connect DreamBox to PC and run DBSS. The light indicator glows green, which means that DreamBox device is ready to work.
- Connect the phone to the front side of DreamBox. The phone must be switched off, and the battery should be charged at least for 40% of its overall power.
- Choose the required phone model from the scrolling list and select a correct access mode. (See “Access modes” description).
- Select “Security” tab.
- Click “Set Auto-lock”.
- Reboot the phone.
- The phone is automatically locked to the inserted Sim-supported network
Contrast Atjusting
Use this option for tuning phone's lcd contrast
- Connect DreamBox to PC and run DBSS. The light indicator glows green, it means that DreamBox device is ready to work.
- Connect the phone to the front side of DreamBox. The phone must be switched off, and the battery should be charged at least for 40% of its overall power.
- Choose the required phone model from the scrolling list.
- Select Service tab.
- To change contrast – switch phone on and click Modify Display Settings button. Use scroll for change phone contrast.
- Press Save.
- Press Exit to finish the operation.
Scenario
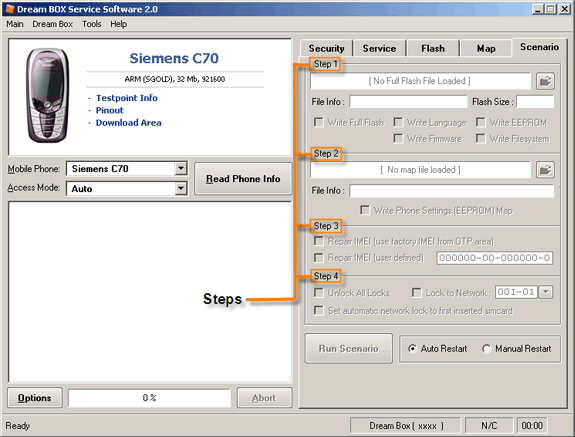
- Connect DreamBox to PC and run DBSS. The light indicator glows green, which means that DreamBox device is ready to work.
- Connect the phone to the front side of DreamBox. The phone must be switched off, and the battery should be charged at least for 40% of its overall power.
- Choose the required phone model from the scrolling list and select a correct access mode. (See “Access modes” description).
- Log to “Scenario” tab.
- Check operation which you want to perform to these phones (Change Firmware/Language, unlock etc...).
- Press “Run scenario”.
- Wait until all operations are completed for the current handset.
- Disconnect the phone.
- Connect the next one.
- Wait until all operations are completed for the current handset.
- Repeat from the step 5 for the required number of handsets.
Note: Identification of the next phone connection can be automatic or manual.
Scenario option tutorial (flash video)
S-Key Viewer
Use this feature to generate a search key that enables quick search for phones by IMEI or model name.
Start SKey Viewer DBSS --> Tools --> Siemens --> Skey Viewer
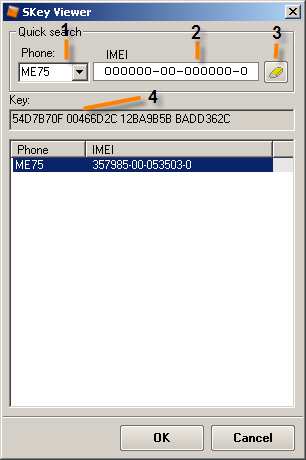
- Choose phone's model which you search or type it yourself
- Type Phone IMEI to find phone key
- Clear Phone IMEI search field
- Here you can see phone key
Note: The phone's key can be not calculated fully. For the complete calculation of the key use IMEI boot mode for this telephone.
Reading Diagnostic code
This option can show phone flash error codes
- Connect DreamBox to PC and run DBSS. The light indicator glows green, which means that DreamBox device is ready to work.
- Connect the phone to the front side of DreamBox. The phone must be switched off, and the battery should be charged at least for 40% of its overall power.
- Choose the required phone model from the scrolling list and select a correct access mode. (See “Access modes” description).
- Select Service tab and click “Read Diagnostic Codes” button to get diagnostic code.
- Power on the handset manually.
- Diagnostic code appears in the log field.
Reading custom flash block memory
This function allows to read and save a custom flash block from the phone
- Connect DreamBox to PC and run DBSS. The light indicator glows green, which means that DreamBox device is ready to work.
- Connect the phone to the front side of DreamBox. The phone must be switched off, and the battery should be charged at least for 40% of its overall power.
- Choose the required phone model from the scrolling list and select a correct access mode. (See “Access modes” description).
- Select Flash tab.
- Click Advanced.
- Enter Flash Starting Address.
- Enter Data Size.
- Click Read Flash Block.
- Save the file to the required directory.
Writing custom flash block memory
This feature allows to write custom a flash block from flash file into the phone.
- Connect DreamBox to PC and run DBSS. The light indicator glows green, which means that DreamBox device is ready to work.
- Connect the phone to the front side of DreamBox. The phone must be switched off, and the battery should be charged at least for 40% of its overall power.
- Choose the required phone model from the scrolling list and select a correct access mode. (See “Access modes” description).
- Select “Flash” tab and press "Advanced".
- Open Phone Flash file.
- Enter “Flash Starting Address”.
- Enter “Data Size”.
- Click “Write Flash Block”.
- Disconnect the handset when the flash is completed.

